Transforming humble leftovers into a culinary masterpiece is a skill every home cook cherishes, and few dishes exemplify this better than a perfectly executed crispy corned beef hash. Far from being just a post-holiday afterthought, this hearty, savory skillet meal stands on its own as a versatile, satisfying, and utterly delicious dish that can grace your table from breakfast to dinner. While it’s a brilliant way to utilize that leftover St. Patrick's Day corned beef, many enthusiasts (myself included!) purposely cook an entire corned beef just to ensure they have enough for this glorious hash. The true magic, however, lies in achieving that irresistible golden-brown crispness that elevates the entire experience. Get ready to ditch soggy hash forever as we dive into the pro tips and tricks for making the ultimate crispy corned beef hash.
Understanding Corned Beef Hash: More Than Just Leftovers
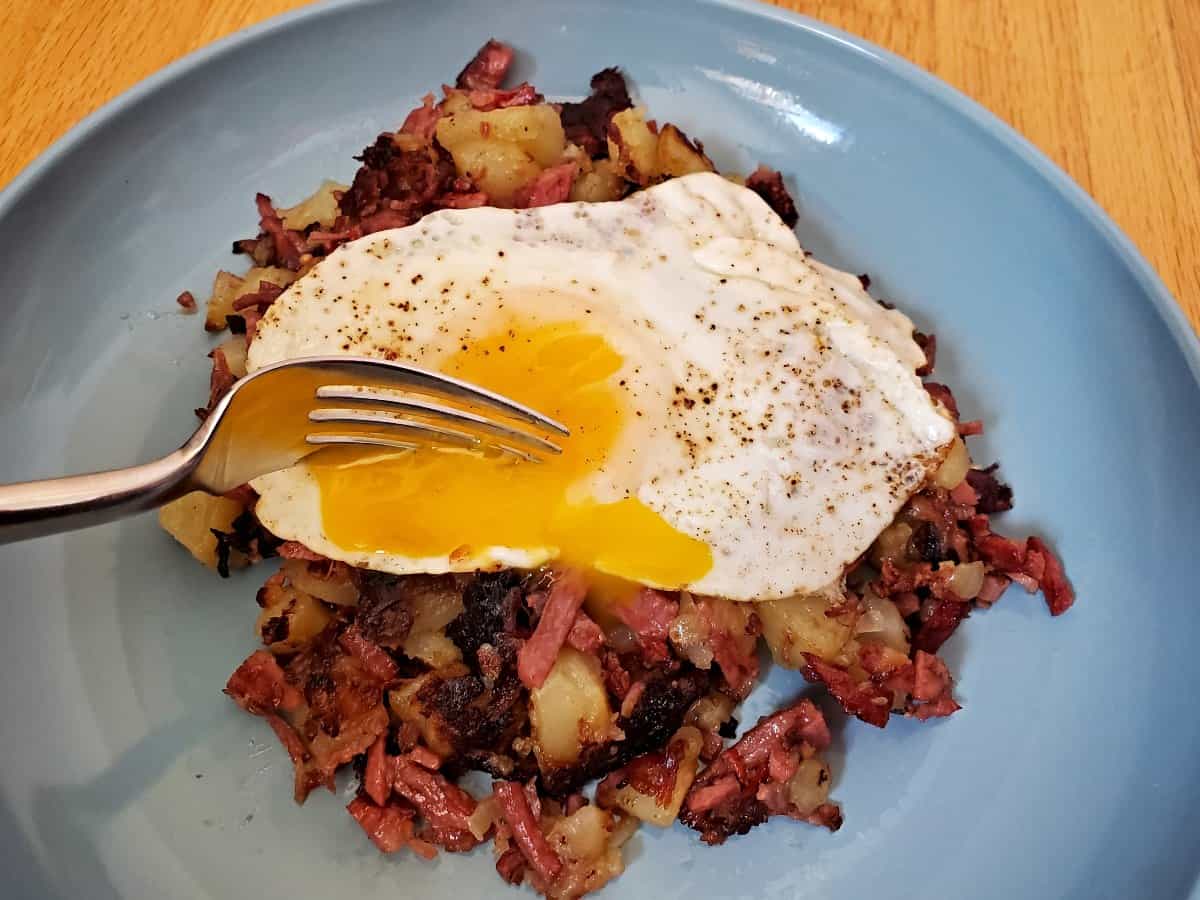
At its heart, corned beef hash is a beloved skillet dish renowned for its simplicity and robust flavor. Traditionally, it's an Irish-American staple made with chopped or shredded corned beef, diced potatoes, and typically onions, all pan-fried until tender within and gloriously crisp on the outside. Often served with a perfectly cooked egg on top, it’s a quintessential comfort food that truly makes leftovers the star of the show.
The beauty of corned beef hash lies in its versatility. While it's a popular choice for a hearty breakfast or brunch, it transitions seamlessly into a satisfying lunch or even a "breakfast for dinner" option. Its savory blend of salty, brined corned beef, starchy potatoes, and aromatic onions creates a flavor profile that is both complex and deeply comforting. The addition of a pop of color, like finely diced carrots (which some affectionately call "leprechaun's gold"), not only brightens the dish but also adds a subtle sweetness. It’s a dish that embodies warmth, tradition, and ingenuity in the kitchen.
Mastering the Crispy Corned Beef Hash: The Secret Sauce
Achieving that coveted crisp exterior on your corned beef hash isn't just about throwing ingredients into a pan; it's a science and an art. Here's how to unlock its full crispy potential:
Ingredient Selection and Preparation for Optimal Crispiness
- The Corned Beef: Leftover cooked corned beef is absolutely ideal for hash. Its flavors have melded, and its texture is perfect for dicing. Ensure you dice or shred your corned beef into small, uniform pieces. Smaller pieces have more surface area to crisp up, adding delightful textural contrast to the dish. If using deli corned beef, opt for a thicker cut you can dice yourself.
- The Potatoes: This is perhaps the most critical ingredient for crispiness. Russet potatoes are your best friend here. Their high starch content means they crisp beautifully on the outside while remaining wonderfully fluffy on the inside. Waxy potatoes, like red or new potatoes, tend to stay denser and resist crisping as well.
- Par-boil and Steam-Dry: Before frying, boil your diced potatoes until they are just tender (fork-tender, but not mushy). Drain them thoroughly, then let them sit in the colander for a minute or two, allowing them to *steam-dry*. This crucial step removes excess surface moisture, which is the enemy of crispiness. Moist potatoes steam instead of fry, preventing that golden crust from forming.
- The Onions & Other Veggies: Yellow or sweet onions, finely diced, will cook down to a mellow sweetness that perfectly complements the savory beef and potatoes. For added flavor and vibrant color, consider incorporating finely diced bell peppers or carrots. Ensure all vegetables are diced small for even cooking and to integrate well into the hash texture. For a spicy kick, a little diced jalapeño or a pinch of cayenne pepper can be a fantastic addition.
- The Fat: Don't skimp on healthy fats! A good quality cooking oil with a high smoke point (like avocado or canola) or even a combination of oil and butter (for flavor) is essential. Enough fat ensures even browning and crisping, creating that delectable crust without sticking.
The Cooking Process: Step-by-Step to Perfection
- The Right Pan Matters: A wide, heavy-bottomed skillet is non-negotiable for truly crispy hash. Cast iron skillets are exceptional due to their even heat distribution and ability to retain heat, which helps create a superior crust. The "wide" aspect is key: crowding the pan is a cardinal sin when seeking crispiness. Give your ingredients space to breathe and brown, rather than steam.
- Building the Layers:
- Heat your fat in the skillet over medium-high heat until shimmering.
- Start with the par-boiled, steam-dried potatoes. Spread them in an even layer. Resist the urge to stir constantly! Let them sit for several minutes until a beautiful golden crust forms on the bottom, then flip and repeat. This allows the Maillard reaction to work its magic, developing deep flavor and color.
- Once the potatoes are starting to crisp, add the diced onions and other harder vegetables (like carrots or bell peppers). Sauté until softened.
- Finally, add the diced corned beef. Stir just enough to combine and allow the corned beef pieces to warm through and get lightly crisp edges. Again, don't over-stir; let it get some color. If the pan seems dry, add a small pat of butter or a drizzle of oil around the edges, letting it melt under the hash, rather than pouring it directly over the top and disturbing the crisping surfaces.
- Finishing with Eggs (Optional but Recommended): Once your hash is perfectly crispy and hot, you have a few options:
- Baked-in Eggs: If your skillet is oven-safe, create a few "wells" in the hash and crack an egg into each. Transfer the skillet to a preheated oven (around 350°F/175°C) and bake until the egg whites are set and the yolks are to your desired runniness.
- Pro Tip for Crispier Hash with Baked Eggs: Pull the skillet from the oven when the eggs look *almost* done, as carryover heat will continue to cook them. For an even crispier top and perfectly set whites, you can briefly broil the hash for 30-60 seconds at the very end (watch it like a hawk to prevent burning!).
- Separately Cooked Eggs: For maximum control over egg doneness and to keep your hash truly pristine and crispy, simply fry or poach eggs separately and place them on top of individual servings of the hash.
- Baked-in Eggs: If your skillet is oven-safe, create a few "wells" in the hash and crack an egg into each. Transfer the skillet to a preheated oven (around 350°F/175°C) and bake until the egg whites are set and the yolks are to your desired runniness.
Beyond the Basics: Elevating Your Corned Beef Hash Experience
Serving Suggestions and Pairings
While a fried or poached egg is the classic companion, your crispy corned beef hash is incredibly versatile. For breakfast or brunch, consider serving it alongside traditional Irish fare like sausage, baked beans, or even some fresh fruit for balance. For lunch or dinner, it pairs beautifully with traditional Irish side dishes such as Irish soda bread or colcannon, or a simple green salad to cut through the richness. Its robust flavor can stand up to hearty sides, making it a perfect one-pan meal centerpiece.
Creative Variations to Try
Don't be afraid to experiment and make your corned beef hash truly your own:
- Cheesy Twist: During the last two minutes of baking with eggs, sprinkle some shredded cheddar cheese over the hash. It melts beautifully, adding another layer of flavor and decadence.
- Boost the Veggies: Stir in sautéed mushrooms, zucchini, or even some spinach (wilted at the very end) for added nutrients and texture.
- Spice It Up: As mentioned, a pinch of cayenne, diced jalapeños, or even a dash of hot sauce at the table can awaken the flavors for those who enjoy a kick.
- Breakfast Burrito or Bowl: Turn leftover hash into a fantastic breakfast burrito filling with scrambled eggs and salsa, or a hearty breakfast bowl with avocado and a dollop of sour cream.
Storing and Reheating Leftovers (Maintaining Crispiness)
Should you be so lucky as to have leftover crispy corned beef hash, store it in a shallow, airtight container in the refrigerator for up to four days. You can also freeze it for up to three months, although the texture, particularly the crispness, may diminish slightly after thawing, the delicious flavor will remain.
When reheating, choose your method wisely to preserve as much crispiness as possible:
- Skillet: This is your best bet for regaining that coveted crispy texture. Heat a lightly oiled skillet over medium-high heat and spread the hash in an even layer, allowing it to re-crisp.
- Oven: Reheat in a 350°F (175°C) oven until heated through to 165°F (74°C). This also helps maintain a good texture compared to the microwave.
- Microwave: While convenient, the microwave will soften the hash, so it's best avoided if crispiness is your priority.
Making truly crispy corned beef hash is a rewarding endeavor that transforms a simple dish into an unforgettable meal. By paying attention to your ingredients, mastering your pan-frying technique, and giving your potatoes the love they deserve, you’ll unlock a world of flavor and texture that will make this humble hash a frequent star in your kitchen. So next time you have leftover corned beef, don’t just warm it up – elevate it to crispy, golden perfection!
